Minimoo2 Sliding Joomla Gallery
Joomla club extensions - jQuery image slider
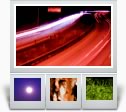 Minimoo2 is a simple jQuery slider that loads images from a specified folder and displays them in a slick thumbnail driven slider. This beautiful, simple image slider is perfect for showcasing your images without the hassle of major extensions, and comes with an amazing set of features that will satisfy your every need.

The grid function in the Zentools module has been designed to replace most of the functionality found in the Prettybox module.
The Zentools module is a swiss army knife approach to Joomla modules. You can create an awesome array of flexible layouts using the Zentools module.
Demonstration


Dependancies
- Joomla 1.5
- JB Library v1.2+
features
- Minimoo2 uses jQuery in no conflict mode
- Load unlimited images into the module automatically from a folder on your webserver
- Smart Image resizer from Shifting Pixel resizes one image to create thumbnail and main images.
- Easy setting of cropping ratio to crop images to fit desire width or height.
- Your choice of prettyPhoto and Thickbox, open in new window, open in same window as options to display the original image when the image is clicked.
- Belated PNGFix built in for prettyPhoto.
- 31 transitions using the jQuery easing script.